23 October 2018

Excellent crawl spot with kids... For campers only.

Last weekend we set off on a short camping trip to try out our new caravan. It turned out that taking along our crawlers was a good idea.We didn't want to go far from home, as it was only a test run for the caravan. So we ended up at campsite "D'n Mastendol" in Rijen, the Netherlands.

RC Dork Jr.s Carisma SCA-1E Lynx ORV in action

As autumn is finally starting to set in here in the Netherlands, there weren't a lot of people at the campsite. So there were very few kids playing at the playground, which turned out to be an excellent crawl spot. A few grassy hills, with a couple of steep climbs, some cut down trees, loose sand, a little stream with clean water and a whole bunch of rocks in different sizes.

Green Man (My SCX10-II based Axial Deadbolt RTR) getting its wheels wet

It was the perfect spot for beginning drivers. Plenty of challenges, varied surfaces and not a lot of distance in between so no whining about being tired from walking 😁 And if the next generation needs a bit of variation in their activities, there's a whole playground available.

The only downside is that it is located on the grounds of the campsite. This means that it is only accessible to campers most of the time. For others, a small entry fee is asked, this is ok if you plan to spend the day there and use all of the facilities, but as an adult crawler, don't expect to be entertained there for more than an hour, maybe 2. Also, I recommend visiting outside the holiday periods, otherwise the playground might be swamped with kids and as they are the primary target audience of this place, they shouldn't be bothered by a bunch of adults playing with their expensive toys.

14 October 2018

RC Junkies / RC Crawler Scaler Groep meeting October 13-14th 2018

Today I visited my first trail event. I've been to other meetings before, but they were either more impromptu crawler sessions or at a track, like the meetings at Speedway Tilburg earlier this year.

It was a 2 day event, but I was only able to visit on Sunday. I asked RC Dork Jr. if he wanted to come along, but he thought that he would need a bit more practice first and decided to stay at home. Looking back, that was a good call, because it probably would have been a bit much for him. Anyway, the weather forecast looked awesome, my batteries were charged and I was looking forward to the event. So with all my gear loaded in the car, I set off on the 45-ish minute drive. There was very little traffic on the road, so I arrived perfectly on time. In the parkinglot I immediately ran into another member of the RC Crawler Scaler Groep. It was good to see a familiar face, so we headed to the assembly point together.

After the usual meeting and greeting and a short explanation about the 2 trails that had been set up for us, we set off for our first trail (a.k.a. Route 2). A short walk along the public road took us from the meeting point to the start of the trail. And right off the bat, the loose sand of the dunes proved to be quite the challenge for some. And once again, the importance of tire choice became obvious. Even though the Axial Ripsaws on my SCX10-II were far from optimal, they held their own on nearly every part of the route(s).

So... much... sand...

The routes were clearly marked, but the markers were scale-sized too, so sometimes it was easy to miss one. Also, at some points it was a little confusing. When driving a 1:1, you usually turn when you pass the sign, in this case, you had to turn before the sign. Not a big deal, but it took a little getting used to. The crew had really put an effort into the routes, adding some nice scale details here and there.

They could have fixed the bridge though...


There were a few pretty steep climbs and descents in route 2, the loose surfaces didn't really help in remaining in control either. So I did end up flipping my rig a few times. But not quite as often as my buddy Riny, who at some points seemed to spend more time rolling than driving 😁. The added weight down low on my rig seemed to work well, but there's not a lot you can do when the surface under your wheels keeps sliding out from under you. But we made it to the end eventually.

Made it!
We arrived back at the meeting point, and while admiring other folks rigs and exchanging tips and tricks we had lunch. The amount of detail on some peoples rigs was downright amazing, and it was good to finally see some of the faces that go with the screen names on the RC Crawler Scaler Groep forum.
I'm pretty sure I could have filled the rest of my day chatting about the hobby, but it was time to set off on the 2nd trail of the day.

Route 1 started off with a few big climbs, and the surface seemed even more loose than on the other trail. A couple of them I was only able to conquer with wheelspeed, there was so little grip. But there was only one climb where I needed to use my 2nd gear.

This trail had a few more man-made elements. A couple of steep climbs up pairs of narrow beams proved too much for the Axial Ripsaws, that were now nicely covered in a thin layer of sand. This was the kind of stuff I tackle in my backyard with ease, but here in the sandy dunes I had to admit defeat.

But then, there it was, the piece de resistance, I had seen a few pics from day 1 pop up on the forum, but in real life, the meters long hanging bridge seemed daunting. The wind had picked up a bit, and people where impatient to try and cross the bridge, so it was not exactly stable, but I got across. It was nerve wrecking, as I stood on the wrong side of the bridge and wouldn't have been able to catch my rig if things went sideways. But I kept my cool and didn't have to watch my rig tumbling down the 25m of sand dune under the bridge.

Just keep swinging, just keep swinging...

The next part of the trail was in many aspects quite similar to the other trail, of course, this is to be expected when both trails run through similar terrain. By now, Riny was out of luck, and out of batteries. His back-up pack failed and he only got about 10 minutes of runtime out of it. But he tagged along for the rest of the trail.

After a while, we seemed to have missed a marker, because the trail seemed to end. There was a bench, so we decided to take a break. Not much later, the next group showed up, and we tagged along to get back on the trail. Only a couple of minutes later, we came across a pond, where if you wanted, you could cross by RC ferry. As I still need to give the waterproofing of my rig some attention, I decided not to cross by ferry.

Cool little markers

After a short break at the pond, we went on our way again for the last part of the trail. It was nice weather, so a lot of people were spending their day in the dunes. But apparently, some people thought it was funny to (re)move some of the markers, because after a while the markers made no sense. We decided to take a shortcut back to the meeting point.

Not the best shortcut though, because it involved going straight up the highest of the dunes. My knee didn't like that very much as it was pretty close to being overloaded as it was. And (as to be expected) it turned out that for the shortcut, the climbing of the dune wasn't needed at all.

All in all it was a great event. The good folks of RC Junkies & RC Crawler Scaler Groep put a lot of work into setting up the trails and that really showed. Therefore I would like to thank them for their effort.

See you next time!


08 October 2018

Speedway Tilburg track maintenance & layout update

It's not all about crawling. As I wanted to do more than crawling the backyard and go to the occasional crawler meet now and then, I decided to join a local RC club last month. Yeah, they have a crawler track too, but the main focus of the club is the faster off-road stuff.
The club really has quite an interesting history, from a couple of friends that shared a hobby, to a club with their own racetrack. And a track needs maintenance, so a bunch of volunteers sacrificed their free Sunday for 2 weeks in a row to get the work done. I wasn't able to join on the first Sunday, but yesterday I was there to support my fellow racers and help out with the work.

Almost done

And while I feel like I did very little (I mean, all I did was do some digging, cut some Astroturf*, carry some rolls of the stuff, think of some ways to put the pieces together on the track and make some smartass comments), it really felt like it was appreciated.

It was cool to see how a group of people that share a hobby can come together and work their asses off, have fun at the same time (the only thing faster than the RC buggies were the wisecracks flying around). And the ultimate reward was that, at the end of the day, the first laps around the updated track could be driven.


So thank you to all the people who got their hands dirty. I'm looking forward to trying out the track, even though my China Special buggy will probably look like a joke compared to the other vehicles out there... But then again, I like a good joke...


*Astroturf as in not necessarily actual Astroturf, but just using the term to illustrate the type of material as it is still early and right now I can't think of the English generic name for the stuff.

07 October 2018

Axial SCX10-II (AX90046) SSD-RC 2-Speed gearbox

It has been a while since I actually performed this upgrade, but as it was an upgrade on my main RC, I still wanted to do a write up on it.

For fathers day, my wife and RC Dork Jr. got me a SSD-RC 2-Speed conversion kit. I put off installing it, because I wanted to wait for some other parts to arrive (RC Schrauben torx screw kit, GPM 57t spur and a Axial 11t pinion). And then replace the motor mount with the cracked screw hole and the spur gear cover that can't be taken off due to a stripped screw.

<rant mode on>
At this point, I would like to point out that I will never do business with Toemen, the supplier of the pinion, again. I should have known better to begin with (read the reviews, you'll know what I mean), but as they were the only dutch reseller that said they had the pinion in stock, I took a gamble.
I ordered an Axial pinion. But when the package arrived, there was a Corally pinion inside. No big deal if that's a honest mistake, but the shipping documents showed that they had scratched out Axial and replaced it with Corally. So they did this on purpose. The way the pinions are built are quite different between these brands. So they are not equal. The Axial is more beefy, the Corally is lighter. Guess what I perfer for a high-torque crawler. Now if they had contacted me to tell me the Axial was out of stock and asked if I wanted a Corally as a substitute, it would have been a different matter. Then it would have been my choice. But they didn't, and now I had payed for shipping, which was half as much as the part itself, for a product that I could have just picked up from my local hobby shop at no additional charge. Returning the part for a refund would mean more additional costs to send it back, so I decided to use the Corally pinion for now. And I'll try to see it not as an expensive pinion, but as a cheap lesson not to do business with this company again. This way of working is totally unacceptable to me and judging by the reviews on the internet, not uncommon for this company.
<rant mode off>

Now, back to the 2-Speed gearbox. Installation was easier than expected. Taking out the annoyingly long screws of the gearbox housing being the most difficult part. There's a couple of attention points though, first, you need to swap the spacer on the axle for the shorter one that was supplied with the kit. Second, don't forget to take out the piece of plastic that's used to close off the opening for the shift fork rod. Other than that, it's just a matter of swapping/installing the gears from the 2-speed kit, sliding in the shift fork and reassembling everything. On reassembly I used the torx screws from the RC Schrauben screw kit, which made a big difference. While I had everything apart I replaced the motor mount, pinion, spur and spur gear cover as well. But guess what, on the new motor mount, a screw hole cracked. Please look into this Axial Quality Control!

After I put the gearbox back in my rig, it was time to install the shift servo. I used the HPI Racing SF-10W waterproof servo that had originally been in my HPI Racing Bullet Flux monstertruck. It's pretty weak as a steering servo, but as a shift servo, it'll probably be just fine. For the installation you need additional servo mount parts that were supplied with the Axial SCX10-II kit, the required spacers for the mounts are included with the 2-speed kit.

Now that the physical instalation is completed, it's time to hook up the electronics. The Y-cable for the lights that was connected to Channel 4 of my RX has to go, as the 4th channel is required for the shift servo. That was easy enough to do. Configuring the channel on my transmitter was a little more work. The shift action needs only very little throw from the servo, so I had to limit the end points quite far to prevent the servo from continuously fighting against the stall point. It took a bit of experimenting, as the servo had to be at an angle to make it fit, so the endpoints had to be set assymetrical, but I got there in the end.

06 October 2018

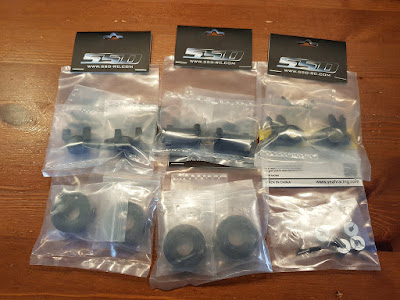
Axial SCX10-II (AX90046) SSD-RC Pro Aluminium parts and brass axle weights

It has been a while since I actually performed this upgrade, but as it was an upgrade on my main RC, I still wanted to do a write up on it.

The improvement in traction that the wheel upgrade gave me, made me wonder if there would be more to be gained in that area. I experimented a little with adding some improvised weights on the axles and that seemed to improve traction even furter. But my improvised solution didn't do a lot of good for the ground clearance of my rig, so was removed again.

I did some research and ended up ordering a few goodies from SSD-RC.

SSD-RC parts & Yeah Racing hex adapters

Their Pro Aluminium C-Hubs, Steering knuckles and rear lockouts. Plus two sets of their brass axle weights (and a set of Yeah Racing hex adapters).

First I needed to do some disassembly, so off came the wheels, hubs, hex adapters, steering links, steering knuckles, c-hubs and rear lockouts. After that I had to pry the hex spacers out of the hubs as they were hopelessly stuck. 

For the installation of my new parts, I started with the rear end, the fit and finish of these SSD-RC parts is excellent and everything is playing perfectly nice with the original Axial parts. 

SSD-RC Pro Aluminium rear lockout & brass axle weight.

One point of attention is, that if you use locking hex adapters, you need to install them next, as adding the axle weight will block access to the locking screw. As you can see in my pic, I did it the other way round and had to take it back apart to correct this. After that, I could install the wheel hubs and put on the wheels.

Perfect!

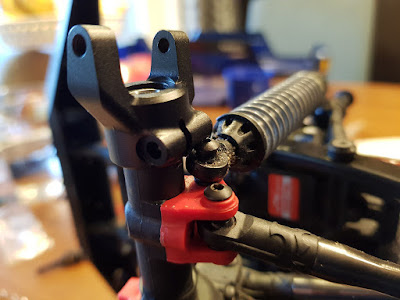
Once the rear was done, I continued with the front. One attention point is that with the Pro Aluminium C-Hub mounted, it becomes impossible to undo the lower shock mounting screw.

SSD-RC Pro Aluminium C-Hub installed. Close fit.

Next were the Pro Aluminium steering knuckles. Again, perfect fit, zero problems installing them as long as I payed attention to the straight insertion of the bearings.

SSD-RC Pro Aluminium steering knuckle
The installation of the axle weights on the steering knuckles is the same as installing them on the real lockouts. Hex adapters go first, then the weights go on. After that, the wheel hub can be fitted.

SSD-RC brass weight & DC Chequered flag wheel hub

With all four wheels back on, I take my rig for a testdrive around the backyard. Wow... The difference is HUGE. So much grip, and the center of gravity is quite a bit lower too. I really have to give it my best to get it to tip over.


05 October 2018

Axial SCX10-II (AX90046) Wheels & tyres

It has been a while since I actually performed this upgrade, but as it was an upgrade on my main RC, I still wanted to do a write up on it.

After the huge improvement caused by the shock rebuild and motor/ESC upgrade, I wanted more. And I had all kinds of upgrade plans. Put some extra weight on the axles, get some better tyres, put on a set of beadlocks so I wouldn't have to glue my tyres anymore, and I had plenty other ideas too.

I was looking at cheap beadlocks on AliExpress, so there would be a little more budget available for the tyres. But you know how these things go. Yes, I came across a set of bronze colored Roost II beadlocks from DC Chequered Flag (a.k.a. Team DC).

Sigh, so pretty

They were only 4 times what I was planning on spending on wheels, so I did the only thing I could possibly do. I ordered them. After the motor/ESC upgrade and the trouble with the spur gear cover, I decided to order a new cover too, as it wasn't going to impact the shipping charges. I thought about getting the very nice looking DC Chequered Flag aluminium cover, but with most of the budget being blown on the wheels, I decided to go with the original plastic part from Axial (but that's for future use).

The wheels were shipped from Austria, so I had to wait a few days. In the mean time, I decided to hit the crawler forums, looking for advice on non-destructive ways of removing glued tyres from rims as re-using them would save me some money. In the mean time I had figured I needed an external BEC if I wanted to keep my shiny new ESC alive, and after a visit to my local hobby shop to pick up said BEC, I had enough budget left for 2 tyres without foams.

When I got home and was trying to find info on the various tyres I had seen at the hobby shop, I stumbled across an add for 2 pairs of Axial Ripsaws in R35 compound, including foam inserts, from a guy that lives less than 6km from the hobby shop I hat just visited. They were only very lightly used and at a good price too. So I dropped him a message and a little later I was back in the car to go pick up my new tyres.

When I got home from the second parts run of the day, I rinsed out the foams and tires (there was some water left from the previous owners last visit to the Ning in them, and rust from his wheels 😜). DHL track and trace showed that the tyres and foams would have a few days to dry before the wheels would arrive.

More work to do

A few days later, my new wheels arrived. And they looked even better in real life. By now, the inserts had fully dried and I could start on installing them right away. Cool, I was going to meet some other local crawlers later, so I would be able to try them out.

Installing the first tyre on the beadlock wheel was a bit of a pain, but I soon discovered the best way to do it and the other 3 together wheels took me the same amount of time as the first one by itself. Now for the next challenge, fitting the wheels to my rig. These wheels didn't have the axle go through them and fix them with a single locknut. No, these came with a wheel hub that was fitted that way and then the wheel was bolted to the hub with 6 tiny bolts per wheel. Ok, not such a big deal, a bit more work, but great for scale looks. But, with the Axial hex adapters, the axle stuck out too far to fit under the wheel.

First I stole the hex adapters from my buggy, they worked on 3 wheels, but production tolerances were on the tight side, so one of the hex adapters wouldn't play nice with the hub from the wheel set. Of course, this was on the last of the wheels, so to keep it all balanced, I had to remove one of the succesfully installed wheels too. In my parts bin I found a couple of hex spacers and used those with the original Axial hex adapters on the front of my rig and added new hex adapters to my shopping list.
I was happy with the end result though, as it doesn't just look good, with the heavier wheels and grippier tyres, there was also a noticeable gain in traction.

Man, they look good


04 October 2018

Axial SCX10-II (AX90046) Castle Creations 10A BEC

It has been a while since I actually performed this upgrade, but as it was an upgrade on my main RC, I still wanted to do a write up on it.

While doing research on tyres, I came across some interesting info regarding the current draw of servos. I decided to measure what my servo was actually drawing from the ESCs built in BEC. And that was a bit of an eye opener. The 20+KG digital servo was nothing like the servos I had used in my tourers in the past. Peaks of 7A under load were no exception. The little 2A BEC inside the ESC would never be able to survive for long under that kind of load. So I needed an external BEC.

I visited my local hobby shop and purchased a Castle Creations 10A CCBEC and a Y-cable to modify so I could hook it up without modifying the cabling of the ESC itself. When I got home, I couldn't believe my luck. There was an envelope from Castle Creations in my mailbox. The Castle Link USB programmer they offered for free with my motor/ESC combo had arrived. Great timing, because it couldn't just be used to program my ESC, it would work on the CCBEC too. 

The installation was a pretty straightforward operation. First, I hooked up the CCBEC to my computer through the Castle Link to set it up. I set it to 6V as that's the limit of my servo. Next I made a Deans/T-connector pass through, and soldered it to the input wires of the CCBEC. And then, I cut the + on one end of the Y-cable. Hook that end up to the ESC. Hook the other end up to the output of the CCBEC and plug the remaining end into the RX. There was no way that RX, CCBEC and Y-cable, and of course all other required (and optional) cabling was goint to fit in the receiver box. So I modified an old battery storage box, mounted the CCBEC in that, and ziptied it to the right side plate. Not the cleanest installation, but it works and I was planning on cleaning up the cabling etc in the future anyway.

03 October 2018

Axial SCX10-II (AX90046) Motor/ESC upgrade

It has been a while since I actually performed this upgrade, but as it was an upgrade on my main RC, I still wanted to do a write up on it.

As you may have read in Part 3 of my review / build report of my Axial SCX10-II (which you can find here), the Surpass Hobby Platinum 3100KV motor and Hobbywing EZRun Waterproof 60A ESC wasn't ideal for crawler use. Even on 2S (which is what I run in most vehicles) it was way too aggressive for crawling. I got it to a point where it was usable by adjusting the settings on both the ESC and in my Radiolink RC3S transmitter. But while it was usable, it was far from smooth in the lower end of the RPMs. Well, that was to be expected from a sensorless brushless motor.

So, what was I going to replace it with? The fan on my EZRun was kind of annoying, so I knew I wanted a fanless ESC. And I wanted to have a good dragbrake which I could adjust to my personal preferences. I considered getting a Hobbywing Quicrun WP 1080 and a high turn count brushed motor. That setup would meet my wishes, no fan, 9 levels of drag brake. I wasn't sure about going back to brushed, but at less than €75 for all parts I needed, it sure was an attractive option.

Then I stumbled across a nice little combo from Castle Creations. A brushless, sensored, waterproof crawler-oriented motor/ESC combo, consisting of their 2280KV 1406 "Slate"-series motor and the Crawler edition of their Mamba Micro X ESC. This too ran without a fan, but what really convinced me was the additional AUX-channel, which when hooked up to a free channel on your RX, allows to adjust a setting on the fly. And the dragbrake was one of the settings it could be applied to. At €200, it was quite a bit more expensive than the brushed setup, and waterproofing the sensorcable would provide me with some other challenges. But I decided to go for it.

The next day, my new toys arrived

I made the installation process a bit harder for myself than it should have been. I could have easily taken out the gearbox and work on it replacing the motor without anything else being in the way. But I didn't... To make matters worse, one of the screws of the spur gear cover was stripped (I might have mentioned the quality of the hardware before). by glueing a hex key in the screw, I managed to loosen it about 1.5 turns. That gave it enough space to carefully bend the cover out and flip it out of the way.

The motor swap was peanuts after that. Take off the pinion, loosen 2 screws, take out the old motor, put in the new motor, install the pinion, adjust the meshing, tighten everything up and done. Replacing the ESC was a matter of minutes too, as it is just stuck onto the sideplate with double sided tape. Cables were put in the receiver box and the ESCs AUX-channel was hooked up to channel 3 (VR) of my RX. A quick test to confirm everything works and then close up the receiver box and spur gear cover.

Cables need some cleaning up, but it works.

Wow, what a difference. So smooth, so much control in the low end. Not to mention the torque this thing produces. It was a big investment as it was half the price of the kit itself, but it was very much worth it.

02 October 2018

Testing the RC Dork YouTube channel

At the moment, I'm trying to set up all aspects of the whole RC Dork thing I got myself into. One of them is a RC Dork YouTube channel and that now has reached the testing phase... So, this is a test... 😀


This video is just to test if my YouTube account is set up correctly. It's a bit of a pointless video, as I bumped the camera and the angle was a bit off. But hey, at least there's a RC vehicle in it.

This is "Green Man", my Axial SCX10-II Deadbolt RTR, going up RC Dork Jr.s slide and coming back down via the lids of his sandbox (which, as he is getting a bit big for a sandbox, will hopefully be dismantled and used to build a backyard crawler course).

At the time of filming, "Green Man" was completely stock. As the surfaces were very slick and slippery, some wheelspeed was required to get to the top. The drag brake did its job on the way back down, but the still very new tyres didn't have enough traction for a very controlled descent.

RC Dork: The RC history Part 9

Crawling into a new discipline of RC.

Yes, we saw a crawler video on youtube. It looked like fun to the both of us, it was slow enough for the offspring and I figured it would teach him a thing or 2 about steering and throttle control. So I bought a couple of FTX Outback Mini 1:24 scale micro crawlers. And it was an instant hit.

FTX Outback Mini, finally, my own pic :)

Now we weren't ripping up the livingroom, we were tearing it apart to create obstacles and try to get our little crawlers over them. We had finally found *our* RC hobby. My RC hobby had always been about the thrill of the speed, but this crawling, it was so relaxing. The crawler bug bit, and it bit hard. Soon I bought an Axial SCX10-II kit for myself followed by a second SCX10-II (Deadbolt RTR) a few months later. I also joined a local RC club, who have a off-road circuit and a crawler track.

My 2 Axial SCX10-IIs

And hey, whaddaya know, the kid liked crawling too. But I told him, that I wasn't going to buy him anymore RC vehicles for him. He had to want it enough to save up for it himself. He was reluctant at first, because the bar was set pretty high for him. But he stuck with it. To motivate him and to give him some more options to choose from, I told him I'd double his savings if he found the crawler he was going for and stuck with it. And he did it. One day I saw the Carisma SCA-1E Lynx ORV online. I knew my kid would like the styling and the chassis was quite affordable and got decent reviews.

My kids Carisma SCA-1E ORV (after I added some lights)


I showed him some pictures and he fell in love. He would have had to save up all of his allowance to be able to buy it in December, but as there is at least a chance of nice weather now, my better half decided to lend him the money, so he could still enjoy his very own crawler before the weather turns all nasty.

So, that's just about it for my RC story so far. I may have left out a few vehicles, but I'm sure they'll pop up in future posts at some point. I hope you will join me on my (and my kids) further RC journeys.


Greetings,

    RC Dork

01 October 2018

Axial SCX10-II (AX90046) Lights

I found some old LED lights that had come with the Basher HellSeeker kit I built for RC Dork Jr. a while back. They were supposed to be mounted on the rollbar, but as RC Dork Jr. is a beginning driver, I didn't want to cause any more weak points in the body by drilling than strictly necessary. So I didn't install the rollbar, and the lights went in the parts box.

But they had 5mm white LEDs, and that was what I needed for the light buckets of the Axial SCX10-II. I cracked open the housing of the LEDs and found that they had a little PCB attached, which had a SMD resistor on it. Cool, that was going to save me some soldering. Unfortunately, due to the PCB, they didn't fit the light buckets properly and made it impossible to use the original brackets to secure the LEDs. So, I'd have to mod the PCBs, or the light buckets. Not wanting to mess up the grille and the lights coming from the parts bin, I decided to just sand down the PCBs until the LEDs properly seated in the light buckets. Now, with a little effort, I was also able to fasten them with the original brackets. I hooked the Y-cable that came with the lights up to the 4th channel of the ESC and there was light!

Goodbye darkness my old friend...

RC Dork: The RC history Part 8

The next generation.

Well, it took a lot of getting used to the high center of gravity of a monstertruck when coming from on-road. But it was fun. I had fun, my kid sayd he loved it too. So I gave the little truck to him and bought a HPI Racing Bullet Flux MT for myself. We went out to drive our trucks a few times, but I noticed my kid didn't seem to enjoy it much. I was pissed off, I only went with the monstertrucks because he liked them. Had he not said he wanted this, I would have gone with a very different RC vehicle. The little one tends to keep things inside, but after a while I managed to figure out that he was overwhelmed by the speed of his truck. I told him he should have told me before, because we can fix such things. So I soldered together a speed limiter and installed that in his truck, but he was still not confident.

Not ours, but ones just like them. Pictures courtesy of the internet.


So I bought a couple of cheap 1:28 scale trucks, so he could practice driving without having to worry. We made a cardboard ramp and blasted around the livingroom. We both got a lot better with the trucks, but he was still scared of the speed.
In the mean time, I kept bashing with the HPI Bullet as well, but usually not much more than running up and down the street and doing jumps over the speedbumps. My better half didn't like us ripping up the livingroom, the seasons changed and the weather outside was wet and nasty so street bashing was not much fun. And then we made a discovery.

30 September 2018

RC Dork: The RC history Part 7

The revival.

I had rediscovered another old love, my love for music and over the years this love for music grew into a new hobby: Headphones. This is not really relevant, but I felt like mentioning it so you won't think I spent a decade without hobbies :P
One day, I found my old Corally C4.1 in a box in the attic, I think I was looking for Christmas decorations or something. And the sight of that chassis in that box instantly brought me joy. I immediately knew what to do. I had to revive the old C4.1.

Not mine, but one just like it. Picture courtesy of the internet.

I ordered a bunch of parts to give it new life. A brushless motor with a matching ESC, a new LiPo saddle pack and some new rubber. Well, things had changed a bit over the years. The battery didn't fit any of the standard mounting options so I had to stick it in with dual sided tape, which was a pain, as I didn't want to risk charging in the car. The new motor was so powerful that the ball diffs wore out in the runtime of a single battery and spares were extremely hard to find. I found some compatible parts, but the chassis, while fully featured was a pain to work on if you didn't want to take it apart completely. I had some fun, I wanted more, but I decided to abandon this project to save the chassis for historic purposes. That, and there were even less suitable spots to run an on-road competition grade RC in the area I now lived.
But my son was growing up, and started to show an interest in Monstertrucks on tv.
So, I had an idea. I would buy a small 1:18 scale cheap semi-hobbygrade monstertruck, give off-road a second chance and see if my son would like it too. If we liked it, I planned on buying a nicer monstertruck for myself and passing the small one on to my son.

29 September 2018

RC Dork: The RC history Part 6

The dark ages.

My brother in law had moved in with his girlfriend and now lived far away. Racing alone was no fun. Occasionally I would come across other parkinglot bashers, but I wasn't really welcome to join them, as my competition grade car was faster than even their quickest 3 speed Nitro. I got caught up in life, work, started hanging out with a group of 1:1 street racers, started to have more problems with my ADD (which I didn't know I had at the time), came close to completely blowing it with my girlfriend (it all worked out in the end, as you might have guessed from the fact that I referred to my RC buddy as brother in law), lost my job, found a new one, but in general went through a pretty dark time. I didn't notice it a lot back then, but looking back, it was pretty bad.
RC went on the back burner again. And life took my wife and myself through some pretty dark times. We moved to another city for work, had too many cancer related deaths in the family, including my mother in law (it's just not fair, you finally find a good one and then they bail out on you :( ). Lost my job twice in 6 months to outsourcing only 2 years after moving to a new city for that job (the 2nd time was a similar job at a different company, in the same city i used to work before I moved. The second time I lost my job came just after I had found out I was going to become a dad. But by now I had married the girl I loved, bought a house, had 2 awesome pet bunnies and a psycho dingo for a dog. And I would be a dad soon... So I had a lot going for me too. I decided not to mope around and went looking for a new job. Found it, and managed to tell my old boss to go f#ck himself before the end date of my expiring contract was reached. As you can imagine, there was little place and time for RC in my life. But the love never died.

28 September 2018

Axial SCX10-II (AX90046) shock rebuild

As you may have read in Part 1 of my review / build report of my Axial SCX10-II (which you can find here), I wasn't too thrilled with the shocks. I took a lot of care assembling them, but they didn't perform like they should. I didn't want to invest in a shock upgrade right away on a new kit, so I decided to rebuild them. Just like the build report, It's been a while since I did this rebuild, but I managed to reconstruct most from forum posts etc.

Ok, this is a bit of an open door, but I started by taking the shocks off the chassis. Once all four of them were on my workbench (a.k.a. kitchen table), I opened them up, dumped the shock oil in a jar and inspected all components of the shocks. On one shock piston, I found a bur that I had apparently overlooked during the building process. That was quickly fixed with an exacto blade. I couldn't find anything wrong with the other 3 shocks.

I decided that for the re-assembly of the shocks, I was going to use the shock caps without the faux-piggyback-reservoirs. I figured that they'd make for less places to get muck stuck while driving. And being a tiny bit easier to screw on straight was just an added bonus.
I pried the o-rings from the previously used shock caps and inspected them for damage. They looked good, so they were installed in the new shock caps.

Now the process of filling them again started. I'm a patient man, but getting all the air out always gets on my nerves. I filled the front shocks with the 30wt shock oil provided in the kit. After I was certain there was not a single air bubble left in the shock, I put a few drops of oil in the shock cap, filled the shock body until the oil literally bulged over and carefully screwed on the shock cap. And cleaned up the excess oil that by now was all over the place.

One rebuilt shock

Victory! The first rebuilt shock was perfect. My guess is that without shock diaphragms, some air bubbles had remained in the cap on my first attempt. I repeated the process for the other 3 shocks, but for the rear shocks, I used a 20wt shock oil as the weight of the SCX10-II is biased to the front.

When I built the kit, I found that the spring adjustment were binding on the shock hoops. So I wanted to add some shims to fix the problem. I was running low on shims and didn't want to waste any where another solution might work. So I looked through the left over plastic bits from the kit. It turns out the rings that usually go between screw and body on the models where a rollcage is installed, were a perfect fit.

With the rebuilt shocks back on the chassis, the handling and flex had improved a LOT. I'm very happy with their performance now, but I do wonder how long they will last, as I read a lot of reviews mentioning leaks and other problems.

1 wheel 10cm (4") in the air, the other 3 planted on the table, it didn't do that before


So far I've been running with these shocks for about 6 months, and so far, there have been no signs of leaking.


Axial SCX10-II 2000 Jeep Cherokee kit (AX90046) build report/review Part 3

It has been about half a year since I actually built this kit, but as it is my main RC, I still wanted to do a write up on it. This is Part 3 of that write up.

Wheels & tires
Again, not much to say about this, just put the inserts in the tires, put the tires on the wheels, make sure they're on straight and glue them. Just like on any other RC car. Then after the glue has set, mount them on the car with 12mm hex adapters, pins and a lock nut. The replica Method Mesh wheels that even come with center covers are a nice touch. The 1.9 BFGoodrich All-Terrain T/A KO2 tires in R35 compound feel sticky enough out of the box. I can see these working well on rocks, but there's not a lot of those around here. Sandy forest trails and slippery tree roots are what I expect to encounter most. But tires are easy enough to replace and these may just surprise me.

Let's Roll!
There's still work to do on the cracked motor mount and shocks, but with the wheels installed it's time to take it for its first spin around the livingroom. This immediately brings attention to another issue. With the electronics in their current setup, the motor is WAY too agressive, it's like driving a drunk, angry short course truck. But it runs and I feel confident about being able to solve the remaining issues, one way or another.

And we have a working crawler

Body
I'm not a big fan of the Jeep Cherokee, but it'll do until I find something I like better. I decided on doing a dark blue paintjob with black accents. I started with cutting and drilling the body. The manual recommends drilling after the painting, but I prefer it this way as there's less (well, none really) chance of damaging the paint when drilling. I have a bit of a love-hate relationship with the hard plastic grille of this body. While it looks nice and gives you great options to add realistic lights, cutting the hole for it is a pain. There's just too little material left under the grille, and it snapped under the stress of being only slightly bent by a pair of brand new ultra sharp lexan scissors. So I cut it away completely. That works, but doesn't look nice.
After that, I masked all the parts I didn't want black and degreased what remained. The body is quite big and I have fairly small hands, so holding it while painting was challenging, but I managed to get the black on without other problems.

Black paint and masking, a little more work required

After the paint had set, I removed all the masking and put on the window masks. Cleaned and degreased the rest of the body and painted the rest of the body blue. I'm used to spraying multiple thin coats, but due to the size of the body, one can of Tamiya paint was enough, but only just.

Cue Eiffel 65

I don't like to stick a ton of decal on my RC cars, so with this kit, I kept it to a minimum too. And as I like the whole scale look, but am performance oriented too, I decided to install the door handles and side mirrors, but not the roof rack, as it wouldn't do the center of gravity any good, especially if I would actually use it to put stuff on.

All done... For now...


Conclusion
There were a few things I didn't like.

First of all, I don't have much love for the included hardware. The quality of the screws would have been acceptable for a sub €100 store brand kit from Hobbyking, but not for a €400 kit from a leading brand*. I really hope Axial will use better hardware on their future releases.

Second, the cracking screw hole on the motor mount. I checked, double checked and triple checked if I screwed up (pun intended) myself. But no, I didn't use the wrong screw, I didn't drive it in at an odd angle. There was nothing I could have done to prevent this from happening other than not screwing in the screw. This is not what I expect to see on a kit at this price point**.

And last, the part of the polycarbonate body along the underside of the hard plastic grille is simply too thin. It is too easily cut, which is not beneficial for the scale look of the body. A small design-change or a pre-cut grille opening would solve this.

But overall, I found the kit easy to build, and had a lot of fun building it. The only real difficulties I encountered were due to my (poor) choice of tools. The manual was very clear, the fit and finish of the parts was excellent. And the rig the build results in, is really a quite capable machine when paired with the right electronics.


* I have ordered a kit of torx screws for the SCX10-II from RC-Schrauben, this makes a huge difference. I'm replacing the screws with those from this kit whenever I replace of upgrade a part. But if I was to build another SCX10-II kit, I'd order another one of these screw kits and use that right from the start.

** Now I could have just been extremely unlucky, but when installing the replacement motor mount that was sent to me by the vendor of the kit, the same thing happened, but on the other side. Again the screw hole for the spur gear cover cracked. So it seems to me that Axial does need to improve their quality control.

Axial SCX10-II 2000 Jeep Cherokee kit (AX90046) build report/review Part 2

It has been about half a year since I actually built this kit, but as it is my main RC, I still wanted to do a write up on it. This is Part 2 of that write up.

Gearbox & motor mount
The kit version of the SCX10-II comes with the 2-speed gearbox housing, but doesn't include the 2-speed guts. Every axle has ball bearings which is good, but the fit of the bearings is a bit tight, so I had to make sure they had to be aligned perfectly or they wouldn't seat properly. Again, the instructions are perfectly clear so pay attention to the bearings, use plenty of grease and building the main gearbox will be a breeze. Here too the hardest thing is screwing the fairly long screws into unthreaded plastic components. The same goes for the transfer case and motor mount.
Once those were in place it was time to install the spur with its slipper clutch. And again, everything went as expected. The usual setup for the slipper spring (screw all the way down, unscrew 3 half turns) seems to work just fine. This part of the instructions also covers the installation of the motor as well. My cheap chinese Surpass Hobby motor fits perfectly. I ignore the advice to put a piece of paper between pinion and spur, as my experience is that this usually ends in less than perfect meshing, so I just do it by hand.
With the motor installed it's time to put on the spur gear cover. It looks ok and it keeps dirt and debris away from the gears, but Axial could have designed it to allow for a bigger spur. The included gears are 32 pitch and with big teeth like that, there won't be a lot of options to change the gearing as just a couple of teeth extra would make the spur too large to fit under the cover. In addtition to that, the design of the gearbox and the position of the motor limit the adjustability of the distance between pinion and spur, even further limiting the grearing options. All while I'd expect people to gear down further to improve crawling performance. But as this is my first crawler build, I'm not going to worry about this too much now.
What does worry me, is that while screwing on the spur gear cover, the screw hole on the motor mount cracks. <insert powerful terms of mild annoyance here> One email to the vendor of the kit and I get a reassuring answer: "Send us the part number, we'll send you a replacement part". Great service. As the crack isn't really going to affect the working of my rig, I decide to continue the build and replace the motor mount later.

Cracked screw hole

Central driveshafts
Building the driveshafts does require a little attention, as they are different lengths for front and rear and additional parts are included for when you want to shorten the wheelbase of the kit. But other than that, it's just a matter of sticking to the right order of things. The driveshafts are pretty sturdy, but they are plastic, so I'll have to see how long they will last.
Once they're assembled, they get mounted to the output shaft of the gearbox.

Chassis part 1
Now it is almost time to put everything together. There's some preparation to be done first, like mounting the skid plate and "motor mounts" on the gearbox and fitting the servo- and batterymounts together. Also the servo is installed. I recomment that if you build this kit for yourself, you make sure that at this stage, you pop in the battery you plan to use and adjust the battery positioning tabs accordingly. This will save you a bit of a hassle trying to adjust them later on.
With the preparations done, we can start mounting everything on the left chassis rail. For parts like the bumper mounts this is simple. For other parts it's a little more tricky as multiple parts are held on by the same screw. Like front shock hoops and battery/servo mount or side plates and skid plate. It's not really a big deal, but if you use standard L-shaped hex keys (like I did), you're going to need a little patience. Also pay attention to how you run your servo cable. If you don't pay attention now (like I did) you're going to have to go through all the frustration of the L-shaped hex keys vs. side plates all over again.
Once everything is mounted to the left chassis rail, the right one is pretty easy, as everything is already supported.
Next up are the axles. The links are bolted to the skid plate, which isn't very complicated, unless you count more of the L-shaped hex keys vs. side plates frustration. Man, maybe I should invest in a set of decent hex key drivers. And don't forget to connect the driveshafts during this process.
With the links attached, it's time to install the shocks. Right away I notice the adjustment rings on the shocks binding on the shock hoops. As I plan on rebuilding the shocks anyway, I leave it like this and make sure to find some shims for when I do the rebuild.
After installing the axles and shocks, all that remains is connecting the steering rod to the servo and the chassis is ready to have its electronics installed.

The assembled chassis

The electronics
Well, what's left anyway. It's just the receiver and the ESC. There's a water resistant receiver box on the left side plate. The receiver box has silicon seals for the lid and where the cables pass through. As positioning the cable in the seal is a bit finicky, I connect the servo and ESC cables to the receiver first. Then put the cables through the silicone seal and slide the seal into its designated slot. For the servo cable its a tight fit, but as the ESC will be stuck on the side plate right next to the receiver box, there's plenty of cable to spare. For now I just pull the excess cable throug the seal and wrap it up inside the receiver box.
There's space for an additional cable in the seal, there's even a part to plug that up included in the kit. Nice touch Axial!
Now that all electronics are present, it's time to connect the motor to the ESC and check if everything does what its supposed to do. So I hook up a small battery and check if everything works. Once that is done, I close up the lid of the receiver box.

Chassis part 2
The last few finishing touches are now mounted on the chassis. Bumpers, body posts and rock sliders are installed in this phase. Nothing special here, just make sure the parts are correctly aligned and fasten the screws. Next!


Click here for Part 1
Click here for Part 3

Axial SCX10-II 2000 Jeep Cherokee kit (AX90046) build report/review Part 1

It has been about half a year since I actually built this kit, but as it is my main RC, I still wanted to do a write up on it. This is Part 1 of that write up.

Intro
I had a first taste of RC crawling with the FTX Outback Mini, I liked it and I wanted more. After doing a little (well, a lot really) of homework, I decided to buy the Axial SCX10-II 2000 Jeep Cherokee kit (AX90046). I chose the kit version as they give you good insight in how your rig is put together, which saves you a lot of time puzzling when you have to replace or want to upgrade a part. Another advantage is that you don't pay for electronics that you will probably end up replacing anyway. Also, I like to build almost as much as I like to ride, so going with a kit is pretty much a no-brainer for me.
The SCX10-II platform was chosen because it has good parts support, both from manufacturer and 3rd party, guaranteeing you can keep your rig running for years to come and giving you tons of tuning options to adjust it to your personal preferences. And of course because it has proven itself to be a very capable machine.

Parts etc. used
  • Axial SCX10-II 2000 Jeep Cherokee kit (AX90046)
  • JX DC5821LV waterproof servo
  • Surpass Hobby Platinum 3100KV sensorless brushless motor
  • Hobbywing EZRun 60A Waterproof ESC
  • Radiolink RC3S transmitter
  • Radiolink R4EH-H
  • Tamiya PS-4 (blue) and PS-5 (black) paint
  • Loctite 243 threadlocker
The motor and ESC were bought for another project, but I ended up using different parts for that, so these were what I had available and seemed like a decent enough starting point. But I knew they would have to be replaced sooner or later to make the most out of this rig. At first I was planning to use the waterproof servo that came stock my HPI Bullet Flux MT, but after reading up on crawling a bit, I decided against using it and opted for the stronger JX.

Axles
After the usual ignoring of the advice to check if everything is complete, the manual starts you off with building the axles. The instructions are clear, the fit and finish of the parts is good, so putting them together is a breeze. But once I got to screwing on the differential covers, I noticed that the quality of the hardware provided with this kit is not what you'd expect in this price range.
Grease and thread locking compound are supplied with the kit, but I chose to substitute the latter for my own trusty bottle of Loctite 243. The little bottle supplied with the kit looks similar, but after a very frustrating experience with a ARR (where the threadlocker used seemed more like a cyanoacrylate adhesive), I wasn't going to take any chances.
The AR44 axle housing is the same for front and rear, the difference is made by the fitting of C-hubs and steering knuckles to the front and lockouts to the rear. This immediately gave me some ideas for 4 wheel steering mods, but I shouldn't be getting ahead of things. All in all the building of the axles is pretty straightforward, the only real point of attention being the angle at which the C-hubs are mounted.

Links
Next up are the steering and suspension links, again, pretty straightforward. The included links are non-adjustable (without using shims etc.), so it is just a matter of screwing everything together. The hardest part being screwing the threaded ends all the way into the unthreaded plastic rod ends. Once the links are put together, it's just a matter of attaching them to the axles in the right place.

Finished axles, links & shocks

Shocks
While doing my homework on the SCX10-II, I noticed that there are quite a few people reporting that the shocks that come with the kit are not exactly the best there are. Well, they are what I have available so I'll just use them and see how they hold up.
The building of the shocks isn't very different from other RC shocks I built. Grease up sealing o-rings and make sure to properly de-bur all parts and it should be ok. Right off the bat I notice that these shocks do not have shock diaphragms, but use a o-ring to achieve a seal at the top end. No big deal, other than a little extra care and attention required during assembly.
The springs supplied are different for front and rear, as the battery pack on the SCX10-II is placed over the front axle. Axial included a bottle of 30wt shock oil, which I used for all four shocks, there's plenty of oil left over afterwards. I took a lot of care building the shocks but I was not thrilled with the results, could those complaining people on the internet be right? On the internet I found all kinds of solutions, like running the shocks empty (save a few drops of oil to keep them lubricated) and drilling additional holes in the shock pistons. These didn't seem like very good solutions to me. So I decided to fit them as they were and rebuild them once the entire rig was put together. That way I'd have a better idea of what would need to change for real world use.

Click here for Part 2
Click here for Part 3

RC Dorks SCX10-II specs

SCX10-II (kit version)
  • Axial SCX10-II (kit version)
  • Castle Creations "Slate" 1406 2280KV Brushless Motor
  • Castle Creations Mamba Micro X Crawler Edition ESC
  • JX DC5821LV Waterproof 22kg/0.10s (@6V) steering servo
  • HPI Racing SF-10W Waterproof 4.5kg/0.18s (@6V) shift servo
  • Castle Creations CCBEC 10A
  • 20A relay to switch BEC on/off @ ESC power on/off
  • Radiolink RC3S 4 channel 2.4GHz transmitter
  • Radiolink R4EH-H 4 channel 2.4GHz receiver
  • SSD-RC Pro Aluminium C-Hubs
  • SSD-RC Pro Aluminium Steering Knuckles
  • SSD-RC Pro Aluminium Rear Lockouts
  • SSD-RC Brass Axle weights (at all 4 wheels)
  • SSD-RC 2-Speed conversion kit
  • RC-Schrauben High tensile steel torx screw kit
  • GPM Racing 57t steel spur gear
  • Corally 11t steel pinion gear
  • AXSpeed Servo relocation mount
  • AXSpeed Low Center of Gravity battery relocation mount
  • Team DC Roost II 1.9" Aluminium Beadlock wheels
  • Axial Ripsaw 1.9" R35 compound tires
  • Yeah Racing 12x6mm locking hex adapters

SCX10-II "The Green Man" Deadbolt RTR
  • Axial SCX10-II Deadbolt RTR
  • Homebrew LEDs for the stock lightbar

RC Dork: The RC history Part 5

The Racing days.

The 1:10 tourers had my preference after the disastrous experience with the messed up 2nd hand Kyosho Ultima ST. I had been looking at Tamiya kits, but couldn't really decide what to get. Then, I stumbled across a Corally C4.1. A competition grade chassis with a 40% discount at a hobbyshop. They were shifting focus to model trains, so all the RC stuff went on sale. I decided then and there that this was the chassis for me. The kit and the build was of a whole different level than the ones I had worked on before. Carbon fiber, graphite, glass fiber reenforced plastics, aluminium bulkheads, ball diffs, it had it all. I added a 12 Triple motor, a no turn limit ESC and a Nissan Skyline R34 body. Boy was this thing FAST, it made my Nitro cars look like kids toys (and they were no slouches either). Soon I realised that just a few milimeters of groundclearance brought along some problems when racing parking lots. The last bash spot we had had a nice smooth asphalt surface, but even the tiniest bit of debris sent the car out of control if you were unlucky and happened to hit it the wrong way.
Not mine, but one just like it, right down to the NiMH cells used. Picture courtesy of the internet.

It was time for the next phase in my hobby. I joined a RC club. But they were just a bit too far from home, and I still had some sort of a social life back then, so I couldn't visit the practice days very often. The club was Electro only, so my brother in law didn't join as he was still running Nitro. I participated in the club competition, but with no time to put in any practice it wasn't much fun as even 10 year olds were able to run better laps than I did. But with a chassis with all the bells and whistles and desparate to have at least one race where I didn't end last I did learn a lot about setting up on road cars. Switched my body to a Dodge Stratus, which was a downforce monster at the time. Bought a set-up board, learned about how to fine tune gearing to the track. And in one short moment of glory, I managed to finish a race in 8th place (out of 10 drivers). They say you should quit while you're ahead, so I cancelled my membership and went back to the parking lots.

27 September 2018

RC Dork: The RC history Part 4

The Nitro days.

After the little M03, I wanted to take it to another level. So at the hobbyshop close to where I worked, I picked up a Carson CR4. A 4WD Nitro powered 1:10 tourer, with a 2-speed gearbox and a Porsche 911 GT3 body. It was a fun car, fast too. And noisy and smelly and greasy and a pain to adjust the engine every single time I took it out. But I loved it. My brother in law picked up the bug as well and bought a Tamiya Nitro. We tore up the local parking lots together and as I wanted to try something other than on-road, I bought a 2nd hand Kyosho Ultima ST (and got a Kyosho PureTen GP Alpha to go with it for free).

Not mine, but ones just like them. Pictures courtesy of the internet.

The Ultima proved to be impossible to set up right and tore up slipper pads like mad. By the time I figured out what the problem was, it needed so many repairs that I decided not to bother with it anymore. As parts support for the Carson CR4 started to dry up in my local shops, I decided to strip whatever I could use and put it on the PureTen chassis, to build the ultimate parkinglot racer. I had tons of fun and learned a lot about setting up RC cars in those days. But local development and real estate projects started to limit the places suitable to run. After a while, there were only 2 suitable spots left in our area. And the best of them now had a fence and was locked up after business hours. The last suitable spot was close to peoples homes and there were complaints about the noise. I didn't want to give up my hobby, so it was time to look into Electro RC again.

26 September 2018

Quick Crawl session with RC Dork Jr.

It's always nice when your local shops stop carrying a specific product you need and therefore have to drive to another town to get it. It's even more fun if your kid isn't old enough to stay home alone and you have to interrupt his Zelda-session and drag him along.
But RC Dork Jr. recently bought a RC crawler of his own, so we decided to take along our RCs and stop at a nice spot to drive them on the way back home.

Sorry for the poor image quality, still figuring out why it looks like this.

And that we did. We made a stop near "Uitkijkpunt Drunense Duinen" (Lookout point Drunense Duinen), at the south side of Dutch national park Loonse en Drunense Duinen. This side of the national park combines pine forest and the edge of the sand dunes that give the park its name.
At this spot the dunes are rather flat, but we stayed in the forest area, where we found some bare tree roots that made nice obstacles. Nothing spectacular, but great for teaching RC Dork Jr. some techniques. He's starting to get the hang of how to approach obstacles, but is still a bit... digital... on the trigger of his remote. When hung up on an obstacle, he tends to try maximum wheel speed as a first solution, digging him in even further and making it even harder to find the grip he needs to clear the obstacle.
But hey, he's 8 years old and has only had his Carisma SCA-1E Lynx ORV for a week, so I think he's doing great. His ride has already been modified with a Team DC 50t motor, which gives it a bit more torque and makes it run a bit more calm. But I did notice a few things about his rig that we will have to improve, but that's something for the future.

Carisma SCA-1E Lynx ORV & Axial SCX10-II Deadbolt

For myself, I brought my Axial SCX10-II Deadbolt RTR, which is completely stock other than the addition of some LEDs. I chose the Deadbolt to make sure the difference between our rigs wouldn't be too big. I can imagine the difference in performance between a stock SCA-1E and a SCX10-II with a ton of upgrades would have been a bit demotivating. Nonetheless the Deadbolt performed a bit better with its bigger, grippier tires and the Deadbolt body allowing for a bit more flex (especially with its narrow rear end).

We only had about 30 minutes before we had to go home again, but we had fun, RC Dork Jr. learned a few things, I got some ideas for improving his rig and we got to spend some time in nature with awesome early-autumn weather, so it was worth the detour.